
import Cocoa

let notification = NSUserNotification()
notification.title = "Notification Test"
notification.informativeText = "Hello World!"
notification.soundName = NSUserNotificationDefaultSoundName

NSUserNotificationCenter.defaultUserNotificationCenter().deliverNotification(notification)
NSUserNotification *notification = [[NSUserNotification alloc] init];
notification.title = @"Notification Test";
notification.informativeText = @"Hello World!";
notification.soundName = NSUserNotificationDefaultSoundName

[[NSUserNotificationCenter defaultUserNotificationCenter] deliverNotification: notification];
이렇게 하면 알림이 데스크탑 우측 상단에 잠깐 표시되었다 사라진다. 알림 센터를 열어보면 당연히 이 알림 기록이 남아있다.

알림을 클릭했을 경우
알림을 마우스로 클릭했을 경우는 NSUserNotificationCenterDelegate의 didActivateNotification 위임메소드가 호출된다. 따라서 delegate를 등록하고 해당 메소드를 구현하면 된다.
# Swift Code:
class SomeNotificationClass: NSObject, NSUserNotificationCenterDelegate {
    ...
    func someInitialization() {
        ...
        NSUserNotificationCenter.defaultCenter().delegate = self
        ...
    }
    ...
    func userNotificationCenter(center: NSUserNotificationCenter,
                                didActivateNotification notification: NSUserNotification) {
        println("Notification Clicked!")
    }
}
// Definition(.h)

@interface SomeNotificationClass: NSObject <NSUserNotificationCenterDelegate>
...
@end

// Implementation(.m)

@implement SomeNotificationClass
...
- (void)someInitialization
{
    ...
    [NSUserNotificationCenter defaultCenter].delegate = self
    ...
}

...

- (void)userNotificationCenter:(NSUserNotificationCenter *)center
        didDeliverNotification:(NSUserNotification *)notification
{
    NSLog(@"Notification Clicked!");
}
알림 스타일
알림은 배너(Banner)와 알림(Alert) 두 가지 타입이 있다. 이 두 가지가 어떤 모양인지는 아래에 있는 시스템 환경설정의 알림 스크린샷을 참고하자.
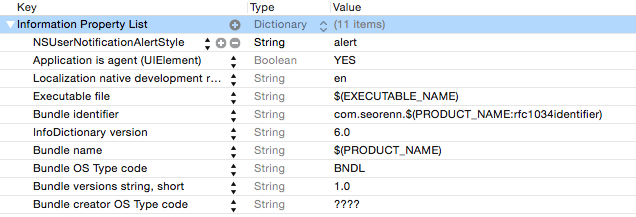
프로젝트에서 원하는 타입을 설정하려면 Info.plist 파일을 열고 NSUserNotificationAlertStyle 이라는 Row를 생성한 뒤 값을 'banner' 혹은 'alert' 로 넣으면 된다.
그런데 이렇게 .plist 를 이용해 설정한 것이 제대로 동작하는지는 확인하지 못 했다. 더구나, Lion 방식의 알림센터는 시스템 환경설정(Preferences) 에서 별도의 설정이 가능하기 때문에 과연 의미가 있는지를 잘 모르겠다.

마무리
여기서는 기본 개념 및 사용법만을 소개하기에 언급하지는 않았지만, 알림에는 버튼을 박거나 스케쥴링을 하는 등 다양한 기능이 제공된다. 필요한 기능을 찾아보고 싶다면 레퍼런스 메뉴얼을 자세히 뒤져보자.


0 comments:
댓글 쓰기